Showing posts with label 2. Planning and Design. Show all posts

Considerations


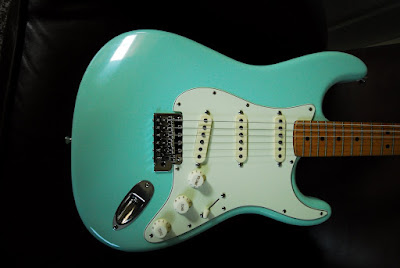
You need to decide what sort of Custom Stratocaster you want to build. Are you looking for something that faithfully recreates a guitar of a certain era? Perhaps there are aspects of a look from one era, but the feel and sound of another era. For example, I love the look of the 50's and 60's, with colors that were borrowed from the cars of that time period (Seafoam Green, Sonic and Daphne Blue, Coral and Fiesta Red), and necks that are now aged to a rich golden yellow, but I am not very excited about necks with 7.5” radius and I really don't care for vintage frets.

A vintage style custom Stratocaster from this era also works for me because I mostly play blues (BB King, SRV, anything 12-bar) and pop punk/rock (Green Day, Coldplay) and I am middle-aged. If you are younger and more inclined to play contemporary music, you might want a look, and certainly a sound, that goes along with that.

A whole other direction is to create a Strat that is unlike anything that has come from Fender. Maybe you want to do something with a quilted maple veneer, or perhaps and exotic solid wood like koa, or perhaps it is not the look of the wood but the sonic qualities from something like mahogany.

You will need to do some research if you do not already have a complete vision. Here are some galleries for you to look through along with whatever you can find on your own:
Also, if you are into vintage Strats, as I am, here are a couple of references so that you can design a project that really maintains that vintage vibe:
Hereare some other very useful resource that is list of other guitar building and repair sites. Lots and lots of links:

Designing Your Custom Strat


Personally, I am highly drawn to vintage Strats. I love the look, the colors, the feel and the sound. They seem to transport me to a different time. A great resource for ideas on what this sort of guitar would look like is the 'Stratocaster Chronicles: Celebrating 50 Years of the Fender Strat', which is available through many resources, and is even available at a reduced price used via Amazon.com.

Going vintage works for a couple of reasons. Vintage Strats were finish with nitro (nitrocellulose lacquer) which is pretty easy to work with and very forgiving. Highway 1 Strats have a nitro finish and are appointed with a vintage style tremolo.

If you are thinking of a vintage style Strat, you might search Google for 'vintage strat' and choose the images option. Another great resource to get a feel for what vintage strats look like is the Strat Collector site: http://www.stratcollector.com/inventory.html

Often, when I am trying to imagine how combination of body color, pickguard, and neck (Maple or Ebony, tinted or not) might look, I search for it through google and see if I can find examples.
If you are thinking of something a little more off the beaten track, more modern and more custom, you might look through the galleries from custom licensed component manufacturers like Warmoth ; http://www.warmoth.com/gallery/gallery.cfm?fuseaction=include_strat

I often learn a lot about parts, resources, building trick, and other ideas by reading the notes from the guitars in galleries such as Warmoths.

So many people have tried to achieve the look of highly used vintage guitar. This is called relicing, and in fact, the Fender Custom Shop produces some gorgeous examples that are in $2,500-$3,500 range. 95% of the relicing I have seen has been very amateur and just results in a Strat that looks like it has been dragged behind a car. I would like to dissuade you from going down this road. I my opinion, it looks like some people choose relicing to disguise a poorly executed finish, when, ironically, a high quality relicing is a very advanced and highly technical execution of guitar finishing.

When choosing pickups, if you don't already have a clear opinion, you should probably explore forums that discuss the pros and cons of various choices and how the work with tube amps and modelling amps.  For example: http://www.strat-talk.com/forum/pickup-forum/31066-best-strat-pups-poll.html

Components


You need to consider if you want to build your guitar from new or used parts and whether those parts are Fender or licensed by Fender (e.g., Warmoth, Allparts, MightyMite).

Personally, I prefer Fender USA parts (even further I really like Deluxe necks) and purchase almost solely through eBay. Fender USA parts are outstanding quality and they hold their value since they are most easily recognized by prospective buyers.

Necks
  • The frets are especially nice on the 2007 and later American necks with exquisitely rolled edges. This is true for the Highway 1 and Standard Strats, though I am not a big fan of the large, 70's style head on the Highway 1 necks, they are a great value. All of the more recent American necks have slightly wider string spacing at the nut.
Bodies
  • I also go for the Nitro (nitrocellulose lacquer) bodies with the vintage style tremolo. These are from the Highway 1 Strats and are much easier to strip and refinish than the Urethane finish of the other American (e.g., standard, deluxe, re-issue) and all import Strats.
  • One of the easiest ways to spot an import body is to look for 1-3 coin sized hole in the body under the pickguard and below the neck pickup.
Tremolo/bridge
  • You will need to consider whether you want a vintage style tremolo or the modern two-point style (which cost a little more, and definitely look more modern), as this will dictate which bodies you can use.
  • Its also important to note the tremolo requirements. Here Fender uses several types with the most common being the vintage 6 hole mount traditional style. These also come in two primary spacings of 2-1/16″ and 2-3/16″. Most import bodies use 2-1/16″ while American and vintage style tend to use 2-3/16″ tremolo kits.
Compatibility
  • You will need to be very mindful of mixing, USA, Mexican, Korean, and Japanese parts from modern and vintage Strats. They are often different dimensions. Same goes for Squires vs. Strats. This get tricky even when buying replacement nuts or saddles, so you will need to do some research to be sure.
Pickguards and Trem Covers
  • The pickguard patterns can vary, most are 11 hole. However, the 50s models have 8 hole and the 60s have a unique 11 hole pattern called ‘62 RI (pay special attention to the location of the screw hole just above the middle pickup). Fender bodies come routed for several different pickup configurations with SSS (single/single/single) or HSS (humbucker/single/single) being the most common. Some bodies have one larger trough cavity that can handle any pickup configuration but these provide the least shielding between pickup, and are thus, prone to being noisey.
  • There are some differences in style for the trem covers. The major two differences are whether there are six small oval holes for string replacement or one hole the is much larger and giving much greater access (more common in the eighties). The six smaller holes presume that you adjust your tremolo in a conventional manner, so, if you tend to have your tremolo flat against the body, you have to use the whammy bar to align the tremolo for string replacement. The second difference is whether the term cover is just barely larger than the rectangular screw pattern or 3/16" larger.
Tuning Machines
  • Vintage Strats and RI (re-issues) most commonly used Kluson tuners. These use 11/32" holes with a bushing press fit into the front of the head. These are great tuners, though perhaps a little delicate. These are fastened to the back of the head with small screws that overlap two adjacent tuners at the same time. It is easy to strip these small Phillips screw heads.
  • Modern Strats used various incarnation of the Fender/Schaller tuning machines including some very nice locking tuners in satin or chrome for the USA deluxe models. These use a nut on the front of the head that screws down over the tuner peg. One the back, there are two small locating pin holes for each tuner, that match up with the two pins (pencil lead sized) protruding from the underside of the tuner and ensuring the that the tuner does not rotate.

Constraints


Other factors that may constrain your custom Fender Stratocaster build project include: budget, tools, workspace, skills, time and patience.

Time and patience are a bigger factor than you might think. If you have time, but not a lot of money, you can patiently shop ebay until you get a 'steal' on each of your parts (it is not hard to save 25%-50% off the average prices if you are diligent and clever).

If you don't not have a safe, clean, enclosed space where you can modulate the ventilation, yet control the dust, you may not be in a position to do any painting and refinishing of the body and/or neck. This might limit your possibilities to what you are able to achieve as far as you control over custom finishes, that is, unless you are willing to pay for someone else to do it for you (e.g., Warmoth).

Additionally, if you don't have some basic skills and tools, then it may constrain you options on the degree of assembly you undertake. On the other hand, non of this is too difficult, and doing so will give you much greater options on your project.
  • Soldering the electronics, at least the output jack if not all of the pots, pickups, capacitors and grounds.
  • Sanding, painting, wet-sanding and polishing the body and perhaps the neck
  • Drilling the neck for tuning machine alignment posts, string tree, possibly dressing the frets and rolling the edges.
  • Screwing together the neck/body, pickguard, attaching the tremolo and spring claw, using a wrench/screwdriver to mount the tuning machines (modern or vintage style), and securing the pots/switches/pickup to the pickguard

Timeline

This sort of a project has some inherent time factors that mean you will have to have certain amount of time and patience. Here is an example:

  • Week 1 - research, planning and designing your project, the process and the budget.
  • Weeks 2 & 3 - purchase all the parts and supplies that you will need, then wait for them to arrive.
  • Weeks 3 & 4 - prepare all the components prior to assembly. This includes neck refinishing, body refinishing, electronics work.
  • End of Week 4 – assembly and setup, then step back and admire your one-of-a-kind Strat!

Believe it or not, this is actually a pretty aggressive timeline, and it may not go this quickly your first time through. Please resist the temptation to rush this process, it will likely result in your making painful, costly, and time consuming mistakes.

One of the things that is most tempting to rush, is the curing time for your finish. Depending on the temperature and humidity this can vary tremdously, not to mention how heavy you spray your finish (without runs) and how close together these coats are.